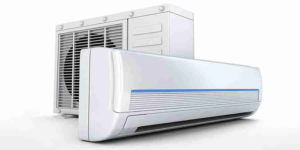
Air Conditioning Is a Game Changer
Air conditioning provides temperature and humidity control. It has applications in a variety of settings including residential and commercial buildings.
In an air conditioner, a liquid refrigerant like Freon boils with a change in pressure to cool the air. It then goes back to a liquid form by passing through a compressor. Click Here to learn more.
Humidity is a key factor in the overall comfort of your living environment. It is especially important during the summer months, as warmer air can hold more water vapor than cool air. High humidity can make your home feel stuffy, cause condensation on windows, and clog drains. Luckily, your air conditioner can help keep indoor humidity at comfortable levels.
During the cooling process, warm air is passed over a set of evaporator coils that are filled with refrigerant. As the air cools, it reaches its dew point, which is the temperature at which moisture in the air condenses. As the water vapor in the air condenses, it drips off the coils into a drain pan. The resulting condensate is then pumped outside through the air conditioner’s drainage system. This process significantly lowers indoor humidity, making your home feel cooler and more comfortable.
The amount of moisture removed from the air depends on a number of factors, including the AC’s size and type, how long it runs, and the temperature at which it is running. An AC that is oversized will struggle to remove moisture from the air, while one that is undersized may not run long enough to make a significant difference. In addition, dirty filters and coils can prevent the air conditioner from removing as much moisture as it should.
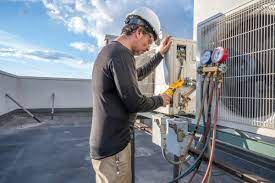
In order to ensure that your air conditioner is effectively lowering indoor humidity, it is recommended that you have it inspected by an experienced professional at least once per year. This will ensure that it is properly sized and functioning, as well as helping to maintain proper refrigerant levels. Additionally, if your home has particularly high humidity levels, you may wish to consider using a dehumidifier in conjunction with your air conditioning.
It Reduces Noise Pollution
Air conditioning systems reduce noise pollution by transforming the constant hum of fan blades into a soothing murmur that fosters a peaceful environment. This enables you to focus on tasks, relax or get better-quality sleep, which is necessary for healthy physical and mental well-being.
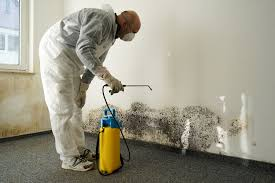
Additionally, AC units reduce odours and fumes that can affect your breathing and overall health by cycling out dirty air with clean, filtered air. These odours can include chemicals from cleaning products, expired milk and other unpleasant smells. Air conditioners can also eliminate harmful particles like dust and mold that contaminate the interior of your home.
However, some people find that the noise generated by air conditioners is too loud and disruptive to their daily lives. If this is the case, it may be time to consider soundproofing solutions or even upgrading to a new model with reduced noise levels.
There are many factors that contribute to AC noise, such as a leaky ductwork or the system working overtime to maintain temperature control. To resolve these issues, a professional can help by performing an inspection and making appropriate repairs or adjustments.
A simple and affordable way to reduce the amount of noise from your air conditioning unit is to place a sound blanket, which is an acoustic cover that dampens sound at its source. This is an easy DIY solution that can be installed on any type of air conditioner, and it is often effective for reducing low-frequency noise.
For outdoor AC units, you can try placing barriers around them that obstruct and redirect sound waves or install fences with dense materials that absorb noise rather than reflecting it back toward the property. However, it is important to maintain the proper distance from these barriers and keep trees and other vegetation pruned to ensure that they don’t obstruct the flow of air.
It Creates a Safe Space for Exercise
Besides reducing humidity levels, ACs remove dust, dirt, and other impurities from the air. This helps to create a clean and healthy environment in your home where you can comfortably workout. In addition, exercising in a cool environment can help you maintain your concentration and focus on your fitness goals.
Excessive sweating can lead to dehydration and may even disrupt your workout performance. Exercising in an air-conditioned room reduces the risk of dehydration and allows you to train comfortably regardless of the weather conditions.
Additionally, the AC regulates your body temperature and makes you less desirable for insects and parasites who prefer warm environments. The cooling of the air in your home also minimizes the damage caused by moisture to furniture and other personal belongings.
In a world where fitness enthusiasts are increasingly demanding optimal workout experiences, an air-conditioned gym is fast becoming a necessity for achieving their fitness aspirations. The temperature, humidity level, and air circulation in the gym play an essential role in determining whether or not you can comfortably push through those last reps and reach that elusive personal best. Having an air-conditioned gym can ensure that you never have to skip your workout session due to hot and humid conditions. If you are looking for a trusted company to install an air conditioning system in your home, contact us at Grand Focus Fit. We have a team of experienced and professional technicians ready to assist you.
It Enhances Better Air Quality
Using the same method as a fridge, an air conditioner cools indoor air by evaporating refrigerant and blowing it through ducts. It also dehumidifies the air, reducing humidity to help prevent mold and mildew. The cooled air is then circulated around the house by the fan, ensuring that all rooms have a consistent temperature.
Modern air conditioning systems are equipped with sophisticated filters that remove airborne pollutants, such as dust mites, pet dander, pollen and other allergy triggers, creating a cleaner, healthier living space for homeowners and their families. This reflects Daikin’s dedication to more than just temperature regulation, but to creating an environment that fosters both physical and respiratory well-being in the home.
Indoor air quality is affected by several factors, including heating and cooling, furniture materials, cleaning products, stoves, ovens, and other household appliances. Poor indoor air quality can exacerbate preexisting respiratory issues, such as allergies or asthma and even lead to their development for the first time.
Besides providing a comfortable, temperature-controlled environment, an air conditioning system also helps reduce stress and boosts mental health by making you feel more relaxed. This is particularly important for individuals who work from home or spend long periods of time in the office, as high levels of stress and irritability can affect productivity. In addition, air conditioning can protect electronic devices from overheating, extending their lifespan. This is one of the more understated benefits that air conditioning provides. Closed doors and windows during operation create a sealed environment that minimises potential entry points for pests, further protecting sensitive equipment. Air circulation deters mosquitoes and other insect pests, preventing them from laying eggs and spreading disease.
It Keeps You Cool
When it comes to precisely controlling the temperature and humidity of indoor spaces, modern air conditioning is a game changer. From movie theaters and offices to homes and gardens, air conditioning keeps you cool by removing heat from the space and transferring it to the outdoors using a refrigerant.
A cooling system operates similar to a refrigerator by using a special gas in a closed loop to remove heat from your home. This works thanks to a physical principle known as latent heat. Liquids need a large amount of heat to boil and solids need even more to melt. When a liquid is heated it gives off this heat through its boiling process. This happens whether the liquid is at its boiling point or above it. Air conditioners use a refrigerant that goes from liquid to gas and back again to cool your home. This cycle happens in three parts of an air conditioner: the evaporator coil, compressor, and condenser.
If you have a split-system air conditioner (meaning the outdoor unit and the indoor air handling unit are separate), your system will operate best when the ambient temperature is close to the indoor temperature. Whenever there is a huge difference in the outdoor and indoor temperatures, your air conditioning system will have to work harder to keep you comfortable.
When deciding on a new air conditioner, look for an ENERGY STAR label. This will help optimize electricity savings and reduce the impact on your energy bills as well as the environment. Apple Rubber can help you choose an air conditioner for your home and make sure it is installed properly. We can also provide you with a wide variety of commercial and industrial air conditioning solutions.